Changing the Image Size in Photoshop
Changing the image size is one of the most frequent operations a Photoshop user is required to do. This is especially true for website admins, who often find themselves in the situation where they have an image that is perfect in every aspect…except for its size.
If you’re not exactly a Photoshop wiz, don’t worry. We got your back with this short and easy, step-by-step guide to how to perfectly resize your images in Photoshop using different tools. You’ll see, it’s easier than it seems.
1. Resize Image
We use this feature when we want to change the size of the image we plan on using.
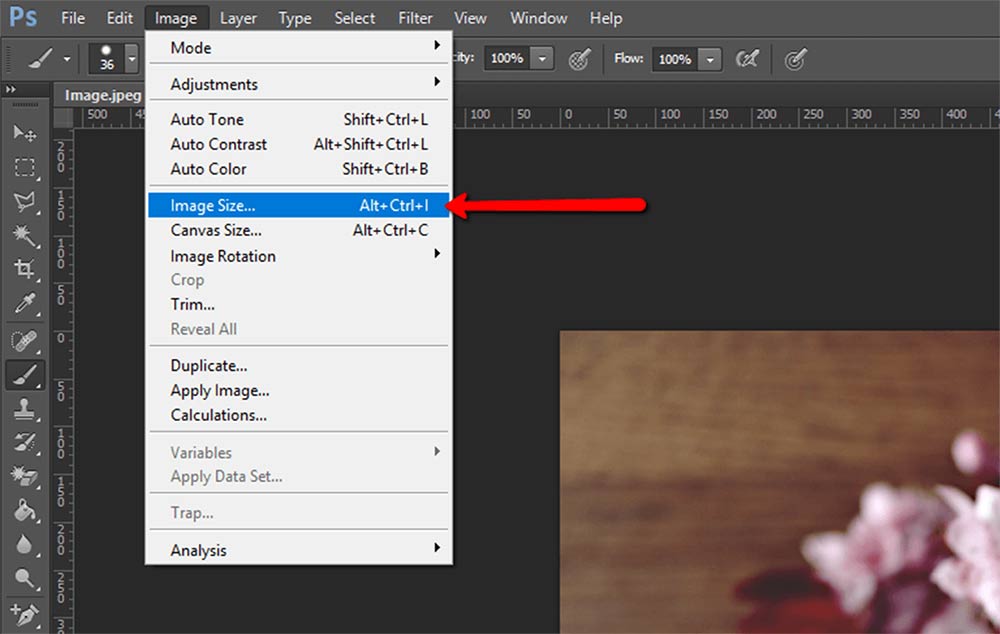
First off, open your Photoshop and head to the Image menu. From there, choose Image Size, which will open the Image Size dialog box. Alternatively, you can use the Alt+Ctrl+I keyboard command to open the dialog box.
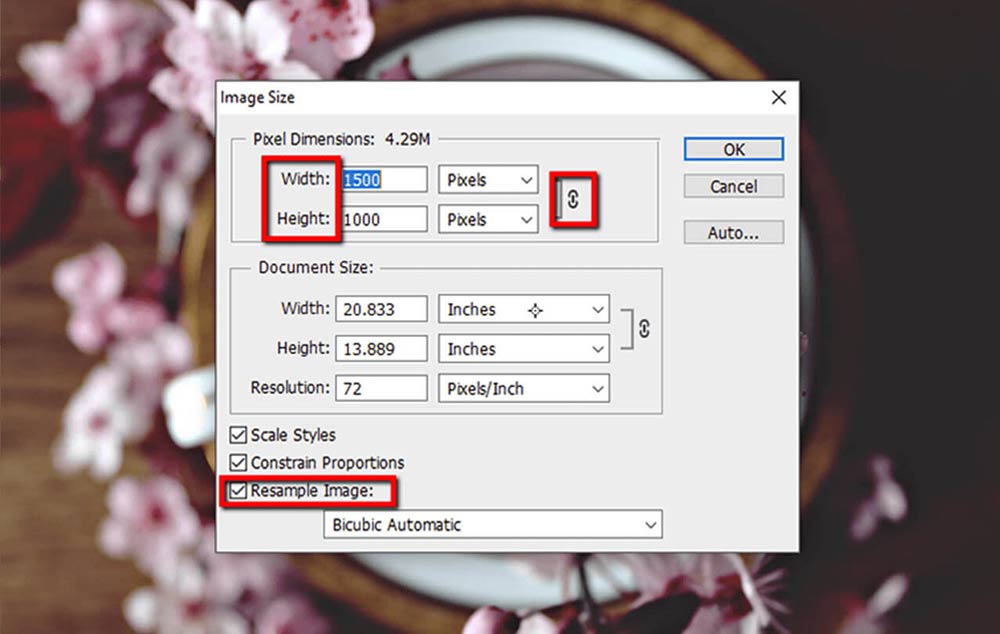
In image size controls, measure the width and height in pixels for images for online use, or in inches for images for print. Make sure the “Link” icon is on. This is important if you want to keep the original image proportions.
Another important control to check is “Resample.” By clicking on this, you’re allowing the program to add or remove some pixels, depending on whether you want to make the image smaller or bigger.
To actually change the image size, simply go to the “Width” field and type in the desired dimensions. The value in the “Height” field will change automatically and proportionally.
Finally, click “OK.”
2. Crop Image
This is something we use when we want to cut out parts of the image we don’t need, and to make a different image ratio.
Start by going to the Tools panel and selecting the “Crop” tool. A crop border will appear automatically around your image.
Place the cursor on any of the crop box corners or edges and drag inwards to reshape the crop box. As you do this, the program will automatically show the preview of your image.
Before proceeding with the crop, you should stop and check one important thing in the Option Bar, the “Delete cropped pixels” option. When this box is checked, it means that your cropped out pixels will be permanently lost after you finish cropping. If you want to keep them just in case, make sure to uncheck this box.
The last thing to do is to click on the checkmark in the Options Bar, which serves as the “Save” button.
3. Canvas Size
While the Image Size command changes the dimensions of your image, the Canvas Size command changes the canvas on which the image sits. This creates some extra room for additional image elements, while the actual image size remains the same.
In order to change the canvas size, go up to the Image menu and choose the “Canvas Size” command.
In the dialog box, the first thing to do is to change the default setting from “Inches” to “Pixels.” After that, there are two ways to change the canvas size. You can either enter the desired width and height, or you can check the “Relative” box, in which case you get to enter the number of pixels you want to add.
Click ok to make the change.
These are some of the techniques you can use to change the size of your images and optimize them for the use on your website. This is important because images are such an important part of any website and you want them to fit in the best possible way.
Additionally, images need to be optimized in order to allow your WordPress website to work properly, without any unnecessary burden that unscaled images might involve.
Now that you know just how to do it, go and make some stunning pages!
We hope that you found this article to be helpful. If you liked it, please feel free to check out some of these articles as well!


