A Complete Guide to Smash Balloon Instagram Feed Plugin
With Instagram being the most popular photo and video-sharing social networking service on the web, it’s no wonder that both big brands and small businesses make sure to incorporate it into their marketing strategy. Instagram works on the principle of visual sharing, which makes this app a perfect place for individual users and big corporations alike. People love it because they get to share all that they’re about with the world by the means of pictures, while businesses use it because it can help give a distinct personality to their brand.
Just like sharing your website’s content on social media, having an instagram feed placed somewhere on your website or blog is also a great way for your visitors to learn more about you and engage them by showing the pictures related to your products. In order to showcase what you’re all about in the best way possible, having a clean and responsive feed is a must. And that’s exactly where Smash Balloon Instagram Feed Plugin can come in handy.
Not only is this plugin super simple to set up, but it also has a great number of options that will enable your feed to blend in with your website’s design flawlessly. We will tell you all that you need to know about Smash Balloon Social Photo Feed, previously known as Instagram feed plugin, and how to set it up properly in order to use its maximum potential. Although this amazing tool has recently changed its name it remained the same when it comes to its features and elements. We will take you through the whole process, step by step:
After you download and install your Smash Balloon Social Photo Feed, you can access the Instagram Feed page on your WordPress Dashboard.
The Instagram Feed tab will be in your Dashboard menu and when you hover over it a menu will appear with all the options.
This tab contains a couple of options that are necessary to set up before you start customizing your plugin.To start click on the Settings in the popup menu – Instagram Feed > Settings.
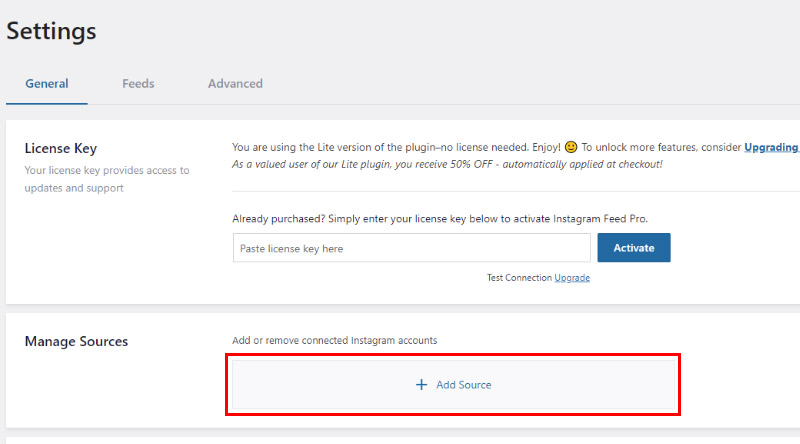
A new screen will open with all the options necessary for connecting your Instagram account to your WP site. The first thing you need to do is click on the Add Source button and the instructions for connecting your account or accounts on will show up.
Just follow through, it is really simple. You can connect more than one account this way. Each screen that opens contains a clear explanation of what you are doing and what you need to click/select.
You will also notice the option Preserve settings when the plugin is removed. It allows you to keep all your settings even after you delete the plugin.
The Feeds tab includes the option to set how often you want the plugin to check for new posts (in minutes, hours or days).
All Feeds tab contains all the settings that you need in order to completely adapt the Smash Balloon Instagram Feed Plugin to your needs.
There are both basic and advanced settings. However, you can only access the latter if you pay for the pro version. Start by clicking the Add New option:
Since we are using the free version you can only select the User Timeline feed type: After you do it, click the Next button in the upper right corner:
After that choose the source for your User timeline.
If you don’t have one click on the Add New button on the left and enter the desired source.
After you do this and click the Next button, you will be taken to the screen where you get to choose the feed width and height, background color, the number of photos that you want to be displayed, whether you want to show ‘load more’ and ‘follow’ buttons, and more.
After you’re done with customizing Instagram Feed to your liking, don’t forget to Save Changes.
Now that you have customized your feed’s style the way that suits you, you can embed it into any shortcode-ready area of your site. First, you need to get the shortcode by clicking on the Embed button in the upper right corner of the screen.
It is possible to add shortcode in two ways:
- by selecting it and copying it as you would any other text,
- or simply by clicking on the Copy button.
This shortcode is used just like any other. You can add it on a page, as part of a post, or in any widget area of your WordPress website.
Customizing the feed to be responsive is very easy and you can actually do it on the go as you customize all the other aspects of the appearance of your feed. Navigate to Customize > Feed Layout and scroll down.
You will see several options for adjusting the look of the feed on different devices.
If you decide to buy a pro version of Instagram Feed plugin, there are plenty of other features that you get upon installation. Among other things, you will get to display hashtag feeds, filter your posts based on your hashtag or word, combine different feed types, display your likes and comments, play videos, etc. You can also set up multiple layout options, such as Grid, Carousel, Masonry, and Highlight.
Not only that, but you will also have an option of contacting the plugin’s friendly support team that is always on hand to help with any issue you may have. Plus, in case you’re not happy with the pro version, there is a 30-day money back guarantee.
Here’s a small glimpse of how your Instagram feed can look like with the pro version.
Carousel layout:
Standard:
In Conclusion
There is really no room for dilemma when it comes to putting your IG feed on your site. The recent plugin update made it even easier to take advantage of all of its features. Instagram is a very powerful network and can only have a positive effect on your website ratings and visits. On the other hand, you can also use your site to promote your social media accounts, simply put – benefits go both ways. Now that you know how easy it is to use instagram plugins, and how necessary they are, wait no more and share your IG feed with your audience.
We hope this article was helpful. If you liked it, feel free to check out some of these articles as well!


